Ford Cologne 2.8L fuel injection conversion
This blog post is mostly aimed at anybody who are interested in converting their early 1980s Ford Ranger/Bronco (RBV) 2.8L (Cologne) motor from a carburetor to fuel injection.
Very little mechanical experience is needed to convert to central fuel injection. This conversion can be done in a weekend, assuming you have all the parts on hand. If you’re anything like myself, it might take longer: multiple trips to junkyards, several days of waiting for ordered parts to arrive, and tons of slacking off in general.
I tried to provide as much detail as possible. I’ve added a contact form at the bottom of this post, so please feel free to contact me if I’ve missed anything, or if you have any questions.
ℹ️ I originally wrote this for my older blog, but have since updated this post here.
Introduction
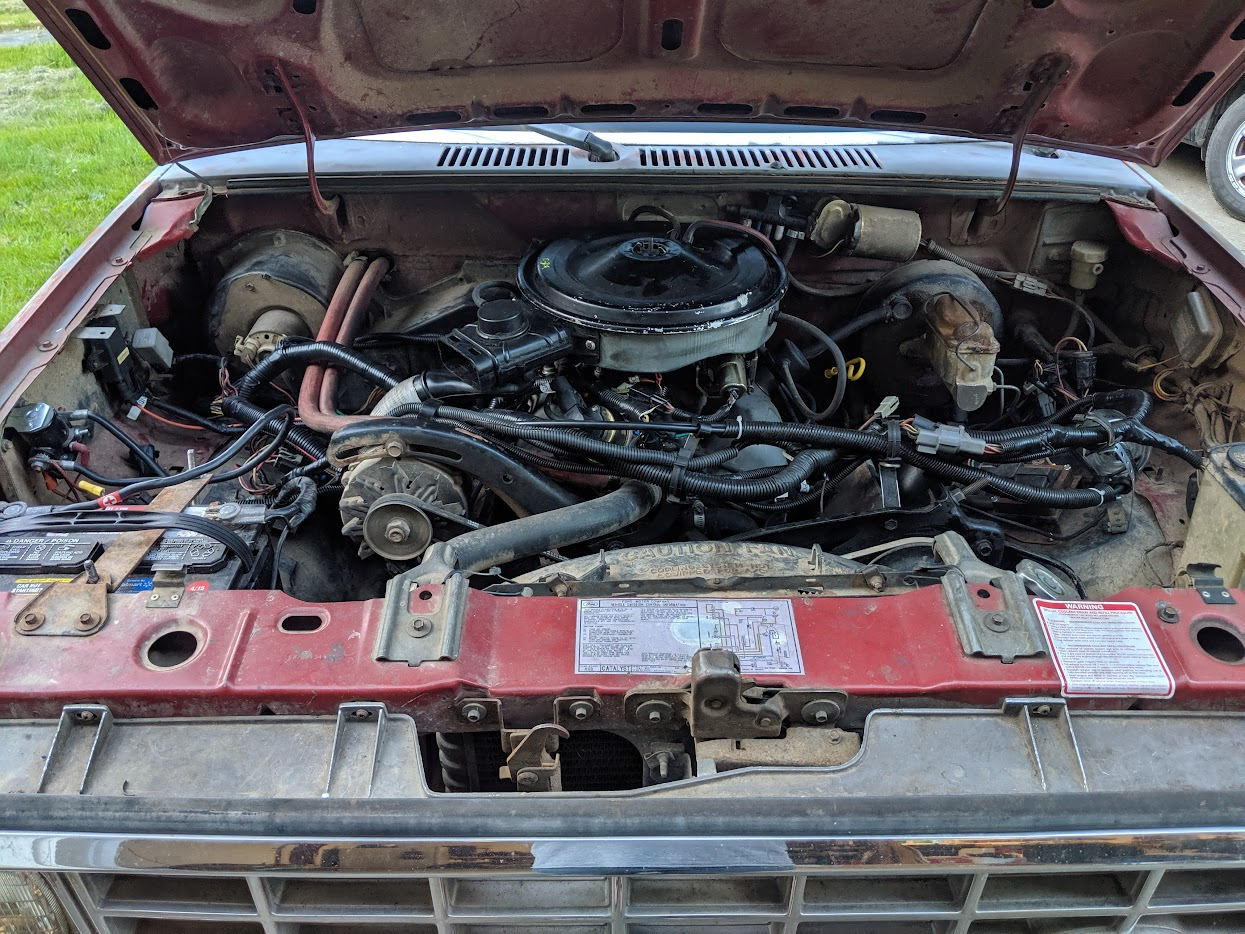
My 1984 Ford Ranger 2.8L was originally equipped with a Motorcraft 2150 2bbl carburetor. Generally, this carb did its job fairly efficiently and without major issue. I recently noticed that the pot metal (aluminum?) that was used in the casting of the carburetor was becoming extremely pitted and was forming a minor leak around the float bowl. I had also over-tightened the screw-on fuel filter and sheared it, leaving the threaded portion in. I tried using an extractor, but with no luck. Time to replace it!
Since I dislike the idea of doing rebuilds and having rubber in the fuel system, I decided to try to convert it to fuel injection.
Unfortunately, there isn’t an easy (or cheap) way to get multiport fuel injection on this vehicle. However, there happens to be an easy way to get throttle body injection (Ford calls this central fuel injection, CFI) working great on this motor! I’ve read online that this conversion is mostly plug-and-play, but I noticed that does have a fuel minor quirks to it.
This conversion should work on 1984 Rangers & Broncos and possibly the 1983 and 1985 year as well.
Basically, this conversion consists of:
- Getting parts from a compatible CFI equipped vehicle (I found a 3.8L V6 Cougar)
- Getting parts for the fuel delivery
- Removing old parts from the Ranger
- Installing “new” parts on to the Ranger
- Splicing a couple of electrical connectors
Tools
There aren’t really any strict requirements for this, but here are a tools that would make this job way easier:
- Multimeter with ammeter, voltmeter, and ohmmeter. A tach/dwell reader is nice too.
- EEC-IV code reader - or you can use the flashing light trick
- Dorman fuel line connector tool
- You might want this if you’re going to be installing new fuel line. Alternatively, you can use a heat gun or a few clamps & lubricant.
- Handheld impact driver for any stuck screws
- Particularly, I was having issues removing the Phillips drive screws on the regulator
- A really good pair of crimpers (recently bought Klein crimpers and they are fucking amazing)
- Label maker
- After pulling out the harness, I used the EEC-IV/CFI booklet (below) to label every connector based on the wire color
Literature
- 1986 3.8L EEC-IV/CFI Engine Control Systems (Function, Operation, Identification)
- Really goes into detail on the TBI/CFI system on the Cougar.
- Has a pinout of the ECU, as well as electrical and vacuum diagrams.
- Can be bought for a few bucks on ebay
- 1984 2.8 Ranger/Bronco EVTM
- Helpful for diagnosing issues on the electrical & vacuum harness
- Can be found on ebay
Additional items
- Nylon fuel line, 5/16” (ish)
- Steel to nylon connectors
- 2.9 fuel tank has a 3/8” outlet and 5/16” inlet
- 2.9 fuel filter is 5/16”
- 2.9 external pump uses 5/16”
- Various hose clamps, for misc. vacuum lines
- Various electrical connectors, shrink tubing, split loom tubing
- Various sheet metal screws or a random assortment of bolts, for securing new components in the engine bay
- I finally found a use for my random bins of weird bolts
Donor Vehicle (ECU & harness, throttle body)
In the mid 80s, Ford only equipped a small handful of vehicles with CFI. By the late 80s, CFI was on its way out, and was replaced with multiport fuel injection.
The only compatible TBI that could be fitted on Ranger’s 2.8 intake are from Ford 3.8 (Canadian Essex) RWD lineup, i.e.: Cougar/Thunderbird, Grenada, LTD/Marquis, and a few others. These vehicles also used a completely different computer (EEC-IV on the CFI equipped models, versus the EEC [v. 1?] on the Ranger’s feedback carb model).
I found a 1986 Mercury Cougar equipped with a 3.8 CFI fuel system and took these parts from it:
- Throttle body
- Take the steel compression to nylon lines too
- Fuel pressure regulator is already mounted on the rear of the throttle body
- Take the phenolic spacer if the Ranger is not equipped with one. Not essential but helps keep the fuel cool
- Also took the PCV + hose
- Air cleaner + associated vacuum tubing
- Note that the air cleaner intake is on the RHS. Since the Ranger has the intake on the LHS, you won’t really need the intake beyond the air cleaner.
- You can grab the exhaust-manifold-heated-cold-start air heater system too. The engine bay is plenty warm, so there might not be much advantage if the intake is truncated.
- Vacuum manifolds (the mini hexagonal one that screws on the intake, plus the plastic one that breaks off the main vacuum to the brake booster, etc)
- If you can, try not to cut any of the lines and take the connector ends (like the connector that goes into the brake booster)
- All the vacuum solenoids and mount
- MAP sensor (it’s the same as the 84, but this one is probably cleaner and newer)
- Entire vacuum harness
- I would take note of which vacuum colors are associated with which components (generally green = EGR, red = main vacuum, black = smog pump, etc.)
- You can potentially remove the air pump, but that’s probably illegal to do in USA. If you do this, just leave the EGR solenoid. Don’t block off the EGR, as it will reduce the overall performance. My air pump was originally seized, so I removed it and blocked off the inlet on the exhaust manifolds.
- EEC-IV computer (located in the passenger kickpanel)
- The power relay is attached on this too.
- Also has a ground cable and another dashboard connector
- The original fuel pump connector is located around the ECU too.
- Take the grommet too!
- Temperature sensors (both coolant temp and air temp)
- Note: you don’t need the dashboard sensors, just the ones connected to the ECU.
- The dashboard sensors typically have a single wire, whereas the ECU’s sensors have a large 2 or 3 pin connector
- Engine electrical harness
- This is the main harness that is connected to the giant EEC-IV connector. I would suggest removing the EEC-IV connector first, feeding it through the firewall hole, and slowly disconnecting everything attached to it.
- You should label anything that you don’t think is obvious
- Avoid cutting wires. If it ends in a ring terminal, unscrew it!
- There are several relays on this harness. I would leave them connected, if possible.
- EGR and its mount
- Heated exhaust O2 sensor mini harness
- This is the loom that is joins the O2 sensors & grounds and brings them to a single connector that plugs into the main harness
- You can grab the O2 sensors too, but I would suggest buying new ones
Tip: take photos of anything that seems confusing, or jot down a few notes. It’s easier to look at a photo than it is to remember which connector goes where.
Additional items that I should’ve grabbed in hindsight:
- Vacuum reservoir You can use the Ranger’s, but it’s a bit larger than the Cougar’s
- The gray and black round male connectors (for: switched power, ignition timing, tripminder, ignition ground, etc)
- This is the connector that is on the driver side near the firewall. The gray has 8 slots, but only 5 terminals are used. The black connector has 4 terminals.
- The EEC-IV electrical harness connects to this. You want BOTH the female side (the side that the EEC is on) AND you want to cut the male side with at least 3” of wire, so that you can splice the existing connectors into this. I’ll go more into detail later.
- Phenolic spacer
- This is the spacer between the intake manifold and the carb/throttle body
- This is mostly used to prevent heat transfer (or something like that).
- My Ranger already had one, although the thickness was different
- Tripminder system (???)
- I actually have never used Ford’s Tripminder and I honestly have no idea what it does.
- There is an extra unused terminal on the black 4 pin (X) connector that is labeled for this. It’s sometimes labeled as “Fuel flow input” and the wire color is light blue & pink stripe.
Since my Ranger was not equipped with an exhaust air pump nor AC, I did not take any of these components. You’ll need to closely examine which parts are needed.
Fuel delivery
⚠️ Warning: When everything is setup and the fuel pumps have been on, the fuel is under a fairly high pressure (40-100psi) even if the car is turned off. You should always relieve this pressure before disconnecting any of the fuel lines. This can be done using the schrader valve on the throttle body’s fuel rail.
There isn’t really an easy way to reuse the existing fuel tank or fuel pump. The 2.8L uses a mechanical pushrod fuel pump and the pressure simply isn’t high enough for the TBI-so it’s best to block that old pump off. Moreover, the throttle body uses a “bypass-style” regulator (aka a “3-way” or “return” style regulator), meaning that it requires a return line for any excess fuel delivered. The 2.8L tank has a single non-pressurized outlet and does not use the same locking ring as the 2.9L fuel pump (the hole diameter is about 1” different).
ℹ️ Short version of the paragraph above: the 2.8L’s fuel tank ain’t compatible so unless you are really good at fabbing stuff up, take one from a 2.9L or buy new.
For delivering the fuel to the throttle body, you will need the following from a Ford 2.9L (e.g., late 80s fuel injected Ranger):
- Fuel tank & internal fuel pump/sending unit
- External (high pressure) fuel pump & fuel filter (located on the driver-side frame rail)
- Fuel line (or make your own)
It’s worth noting that the sending unit does not match the original 2.8’s sending unit’s resistance. I believe the original uses a 70 ohm range, while the 2.9 is an 80 ohm sending unit. This isn’t a big deal, but your fuel gauge might be off. You might be able to adapt the old sending unit on to the 2.9’s unit, but it’s spot welded on and really isn’t worth the effort.
ℹ️ Tip from the future: I originally thought I could just splice in a resistor in series to bring the resistance up, but it turns out that there is hella current running through this wire. I might’ve messed this up, but be careful because the resistor can get quite hot. I don’t really know how fuel senders work, and I never looked into this, but it might be a difference in impedences not just resistances. I would recommend just disconnecting the sending unit and just go off of the odo instead.
I would suggest using steel line from a junkyard 2.9 Ranger vehicle that has a matching wheelbase.
This is probably a really stupid idea, but I did not use any steel line. I ran new nylon 5/16” line throughout the entirety of the truck and used Dorman quick connectors. I fucking love these connectors so much: they are cheap high pressure connectors that can easily adapt from 5/16” nylon to 1/4” (used in the throttle body’s return line) to 3/8” (used on the throttle body’s inlet). Both Rockauto and Amazon has pretty decent prices for these.
The electrical connection is fairly easy. Run 3 wires with loom to the engine bay for ground, fuel pump on, and sensor. Both the power/ground lines will carry 12V at a max of around 5A.
Removing the mechanical pump
The mechanical pump is located on bottom front of the driver’s side of the engine, near the oil sending unit. Just follow the fuel line and you’ll see it. With everything mounted, it’s extremely hard to reach with a socket wrench: I had to use a wobbly CV and like two 3/8” extensions. I did also move the power steering pump/pulley to it’s tallest setting by loosening the bolts and tightening the top tensioner bolt, just to make this task a bit easier.
When you remove the fuel pump, the old pushrod should slide out. If it doesn’t come out, you’ll need to tickle the hole until it does. Maybe you could use a magnet or something (I really have no idea) It’s pretty crucial to remove the old pushrod, or it might bang against the block off plate.
You can either trace the old fuel pump on to sheet metal and fabricate a block off plate, or you can be lazy (like me!) and just use a 20mm freeze plug instead. I’m not too worried about oil leaks here, mostly because it’s a low oil pressure spot. If you use a block off plate over a plug, remember to use a new gasket too.
Although I used a freeze plug here, I think making a block off plate would be easier in the long run. It was very difficult to tap in a freeze plug from within the engine bay. I ended up sandwiching the freeze plug between the fuel pump & engine block, tighten it again, and then remove it. When I did this, the brass(ish) fuel pump broke in half and left the freeze plug only mostly inserted. Good enough for now.
Remove the existing electrical harness
Disconnect the battery and put it on a trickle charger (if you think this project will take a while).
You may also want to take note of the location of any electrical or vacuum lines that you’re unsure of. Take photos for later reference, if needed.
On the passenger kick panel, disconnect the Ranger’s ECU by unscrewing the connector bolt and carefully sliding it out. Remove the two bolts that hold on to the grommet on the firewall. Carefully slide the harness through the hole in the firewall.
There are several mini-harnesses that can be separated from the existing harness:
- Alternator wires
- The thick black/orange one
- If equipped, the ammeter wires that go into the dashboard
- Dashboard sensor wires
- Oil sensor unit (1 wire)
- Coolant temperature sensor (1 wire)
Disconnect all vacuum lines. Remove all the vacuum solenoids.
Unplug all the other connectors and grounds, and remove the harness from the engine bay. Your engine bay should look fairly empty now.
Carburetor removal & TBI installation
Disconnect any additional lines going into the carburetor. Unbolt the 4 bolts (don’t lose these!) and remove it.
Replace the gasket between the phenolic spacer and carefully place the throttle body over it. Torque the old bolts to specification. Install the PCV and hose (that goes to it).
It might be worth replacing the fuel pressure regulator at this point. These can go bad on older vehicles. I replaced the regulator and used metric hex cap screws with washers instead of the Phillips drive screws.
Install sensors
Remove the old coolant temperature sensor (used a monkey wrench for this). Install the newer sensor.
Remove the old EGR & mount. Install the new EGR & mount.
Dual exhaust oxygen sensors
The EEC-IV requires two heated exhaust gas O2 sensors. Since the 2.8’s manifolds contain only one O2 sensor port on the driver side manifold, you’ll need to install a new one.
ℹ️ There is a possibility of purchasing an O2 simulator, but I would not suggest that. The ECU computes the fuel mixture based on the returned voltage of the sensor, so having a constant value would not be advisable.
Here are a couple of options for installing your additional O2 sensor:
- Drill & tap (M18x1.5) a new hole on the passenger side manifold. There is a flat spot on the manifold that would be a good spot for a sensor. I did this and it worked out well.
- Remove the Y-pipe and weld or strap on a new O2 sensor bung (might be the best option)
- Install steel exhaust headers and weld on a bung. There are performance headers available for this vehicle, but they’re hard to find. The Aerostar 2.8 headers also share the same bolt pattern as the cast manifolds, so these might work, but you’ll need to find or fab a y-pipe, so ymmv.
ℹ️ I would not try welding onto the cast iron manifolds. I mean, you could try but it would require lots of preheating and the chance of it turning into a mess is pretty high.
Exhaust considerations
Supposedly, because the new fuel system can move higher amounts of air and fuel, you should consider running a larger exhaust. When I bought my truck, it did not have any exhaust pipe beyond the manifold. I ran an intermediate pipe from the y-pipe flange to a glasspack, then to a rear exhaust pipe (that went over the rear axle). This worked really well for cheap and the exhaust wasn’t too obnoxiously loud.
Creating a dashboard/ignition connector adapter
On the driver side fender well, there are two connectors used to: connect the ignition coil & control module, power the ECU, connect dashboard sensors, and do other things. We’ll need to create an adapter between these two connectors and the new EEC-IV connectors.
This is how the ignition coil should be attached:

Testing
Before trying to start, it might be worth doing a couple of tests.
- Turn the ignition on. You should hear the fuel pump turn on and the fuel pump should turn on temporarily.
- Check the fuel pressure using the schrader valve on the fuel rail on the throttle body. You can use loaner pressure testers from O’Reilly’s or NAPA, etc.
- Double check all the grounds with an ohmmeter.
- With the ignition on, test the +5V on either the EGR feedback sensor or the throttle position sensor. The ECU has an onboard 5V regulator that is critical.
Further thoughts
I sold my truck for a few hundred. It ran fine but had a rear main seal leak, needed new axle seals, new brakes, and a ton of maintainance. I do wish I would’ve kept it, considering it was surprisingly reliable and it was great having the ability to haul soil and rocks around.
Overall, I’d recommend doing this if you can find the parts at a junkyard. It’s probably cheaper (albeit less fun) to actually get a TBI system from Edelbrock or Holley.
Links
There’s a helpful article on the Ranger Station, Fuel Injection For Your 2.8L Ford Ranger, by James Marcy.